Monday, April 1, 2019

Second Semester - Day 43 - 50 Independent Project and Stone setting PRoject

Belt Buckle  http://porcelainart.blogspot.com/2010/11/still-crazy-after-all-these-years.html
Amelia Mason  http://nausetmetals.wordpress.com/

Warm Up - Take out your notebook and paper and list at least 5 jewelry techniques you've learned this year. Be specific 

Learning Objective-  You will be able to create your choice of jewelry using textural techniques on metal, found objects, or rivets to combine metals and objects for a unified jewelry design. 

Language Objective-  You will critique the artwork verbally during the class period.  

Final Independent Project Criteria- 
  • You will pick a word for your inspiration; define the word and come up with concepts to communicate something about your life that relates to the word. Get images!
  • Draw 10 thumbnails
  • Repeat shapes within your design
  • Use 3 jewelry techniques to include in your design. (saw peircing, wire-work/chain-work, wire solder design, cabochon stone setting, overlay sweat solder, acid etch, hammer, rollermill, reticulation, riveting, etc.) 
  • Include more than one piece of metal using a cold connection,(rivet, links) or solder connection
  • Complete a finish using patinas or high polish 
Agenda- 
  • Turn in your rivet project and work on your Independent Jewelry Assignment.  
  • We will be typing artist statements next Wednesday the 23rd.  
  • Start thinking about what you would like to do for your Independent Jewelry Project.
    • Use the Independent Jewelry Project Planning sheet to plan your next project.
    • Independent Jewelry piece - Due April 26th
    • Artist Statement on Google Classroom and Printed out- Due April 26th
    • Displaying your work in the case - Due Monday April 29th
    • Critiquing another artists work from the school - Due May 1st

Friday, March 22, 2019

2nd Semester - Day 37 - The History of Jewelry & Design


Pendant, Phoenicia 600BC-500BC, Gold set with green glass, Victoria & Albert Museum, London
http://guity-novin.blogspot.com/2014/03/chapter-75-history-of-jewellery-design.html
Warm Up - Look up the following vocabulary words and share with your group at your table.

Vocabulary - 

adornment
protection
status/royalty
symbolism

Content Objective - Students will research Jewelry History and its design elements to support their Independent Jewelry Project.  

Language Objective - Students will be able to define, in writing, design elements as they relate to the purpose or meaning of jewelry created throughout history.  

Agenda -
  • Look up Vocabulary words
  • Get in groups of 3 or 4 to read the article at your table. Use your individual handouts to guide your group reading of, 'A History of Jewellry' 
    • Read your section of the article.
    • Take notes 
    • Share a synopsis with the class.   
  • Article Link - https://www.vam.ac.uk/articles/a-history-of-jewellery
  • Come up with three ideas for your own personal research for your Independent Jewelry Project.
  • Continue to work on your Riveted Found Object Texture pieces.  


Tuesday, January 29, 2019

2nd Semester - Day 18 - 30 Casting - Rivet Texture Patina

Warm Up- Write down the vocabulary words in your notes.  

Vocabulary- 
rivet- A metal bolt or pin having a head on one end, inserted through aligned holes in the pieces to be joined and then hammered on the plain end so as to form a second head.

found object- A natural or manufactured object that is 'found' by the artist and displayed as art or combined with other elements in a work of art.

patina- As a general term, patina refers to the change in an object's surface resulting from natural aging.  In copper or bronze jewelry or sculpture, patina specifically refers to the surface of the metal itself often altered by the artist by application of chemicals. 
We will use three for this project, heat patina, green patina, and liver of sulfur patina. 
Learning Objective-  I- You will be able to create your choice of jewelry using textural techniques on metal, found objects, and rivets to combine metals and objects for a unified jewelry design.
 
Language Objective- Write down the definition of rivet and found-object,and look at examples to support your design ideas for this project.   


http://www.hodgepodgerie.com/cold-connections-class.html

Steampunk Pendant
by Robert Dancik 
‘They Respected Sheriff Ben Even Though His Badge Was a Bottle Cap’

Richard-Salley

 More Examples on Riveting for Jewelry Website


Agenda- 
  • Look at examples
  • Today plan your ideas by brainstorming found objects using TerraForma Cards.  You will need to pick an object that can be drilled through.  Glass or stone will not work.  Plastic or metal will. 
  • If you know your object, think about how you can repeat or reflect the found object in the design of the whole piece. 
  • Complete your two waxes for a grade
    • Sprue them with a partner or two and fill out the Cast Check List
Homework- Bring in a found object that you can design a piece of jewelry around.  

Riveted Found Object Jewelry Project Criteria
  • Include one found object- must be able to attach or drill through using cold connections.  
  • Include three pieces of metal that are designed, textured, and patina-ed by you.  
  • Use three different textures, (hammer, stamp, rollermill, reticulation, flexible shaft).
  • Use at least two different patinas, (green patina, liver of sulfur, and/or heat patina).
  • Include 3 rivets incorporated into the design of your work.  
  • Finish your work by making a complete piece of jewelry or sculpture. 

Student work: 
Ashely H
Keagan L
Rebecca S

Shelby W
Anthony M
Samantha U
Katie
Anthony M

Resources: http://www.flickr.com/photos/madartjewelry/3744644622/in/photostream/
http://oureclecticlives.blogspot.com/2010/06/july-and-august-classes.html
http://www.sweetbeadstudio.com/?attachment_id=2522

Thursday, January 10, 2019

2nd Semester: Day 3 - Wax Carving

https://www.pinterest.com/pin/493988652853259556/

Warm Up -
Shorten and write down the following Wax Carving Process Steps. 


Wax Carving Process
Your final carved ring in wax must weigh less than 1.7 grams when finished. 

  • Saw ring wax tube with the miter box and saw
    • Saw the width thickness that you want
    • Saw 2 pieces for rings you will be carving and then you will choose the best carving.
  • Sizer:  Use the wax sizer mandrel to carve out the correct sizer
    • Don’t carve too much
    • Be aware to not leave big marks on inside by pressing too hard
  •   Carving: 
    1. Don’t carve too much! Work on creating the overall shape before file off a lot of material. 
    2. Be aware to not leave big marks on inside by pressing too hard
    3. To start use pointed tools to draw on wax first if you want to draw out design  
    4. Start with the large wax file and carve the basic shape
    5. Use your large half round file to form design
    6. Go to the carving tools and small files to get designs
    7. Remember to carve the thickest parts first, then go down to the thinnest to prevent breaking the wax model
    8. If you press too hard you will break the wax model.
    9. Never try on your ring during the carving process because it can easily break.
    10. If you break the wax, repair it with super glue or start over. Super glue doesn't always work. 
    11. Don't use your first piece as a gift for your sweetheart or bestie.. Your first attempt is going to be very special and will be something that you will keep forever to look back on.  
    12. Weight: Remember someone is only going to wear a piece of jewelry if it is comfortable. Rings for men shouldn't weigh more than 15 grams and less for women. The weight of the wax will be a different ratio for each metal. For Silver multiply the weight of the finished wax piece by 10.5

4.    Finishing Steps:
a.    It is very important that all marks are out of the wax.  It takes a lot less time to remove marks now, than if in the metal!!!
b.    Gently file with fine files, then sand with 400, then 600, buff with orange oil.

           
REMEMBER TO TAKE OUT ALL SCRATCHES NOW THAT YOU SEE IN THE WAX!!!
IT WILL TAKE 10 TIMES LONGER TO GET THEM OUT OF METAL!!!!


Tuesday, January 8, 2019

2nd Semester- Day 1 Sculptural Ring Wax Casting


WELCOME BACK!!!
Happy New Year! 

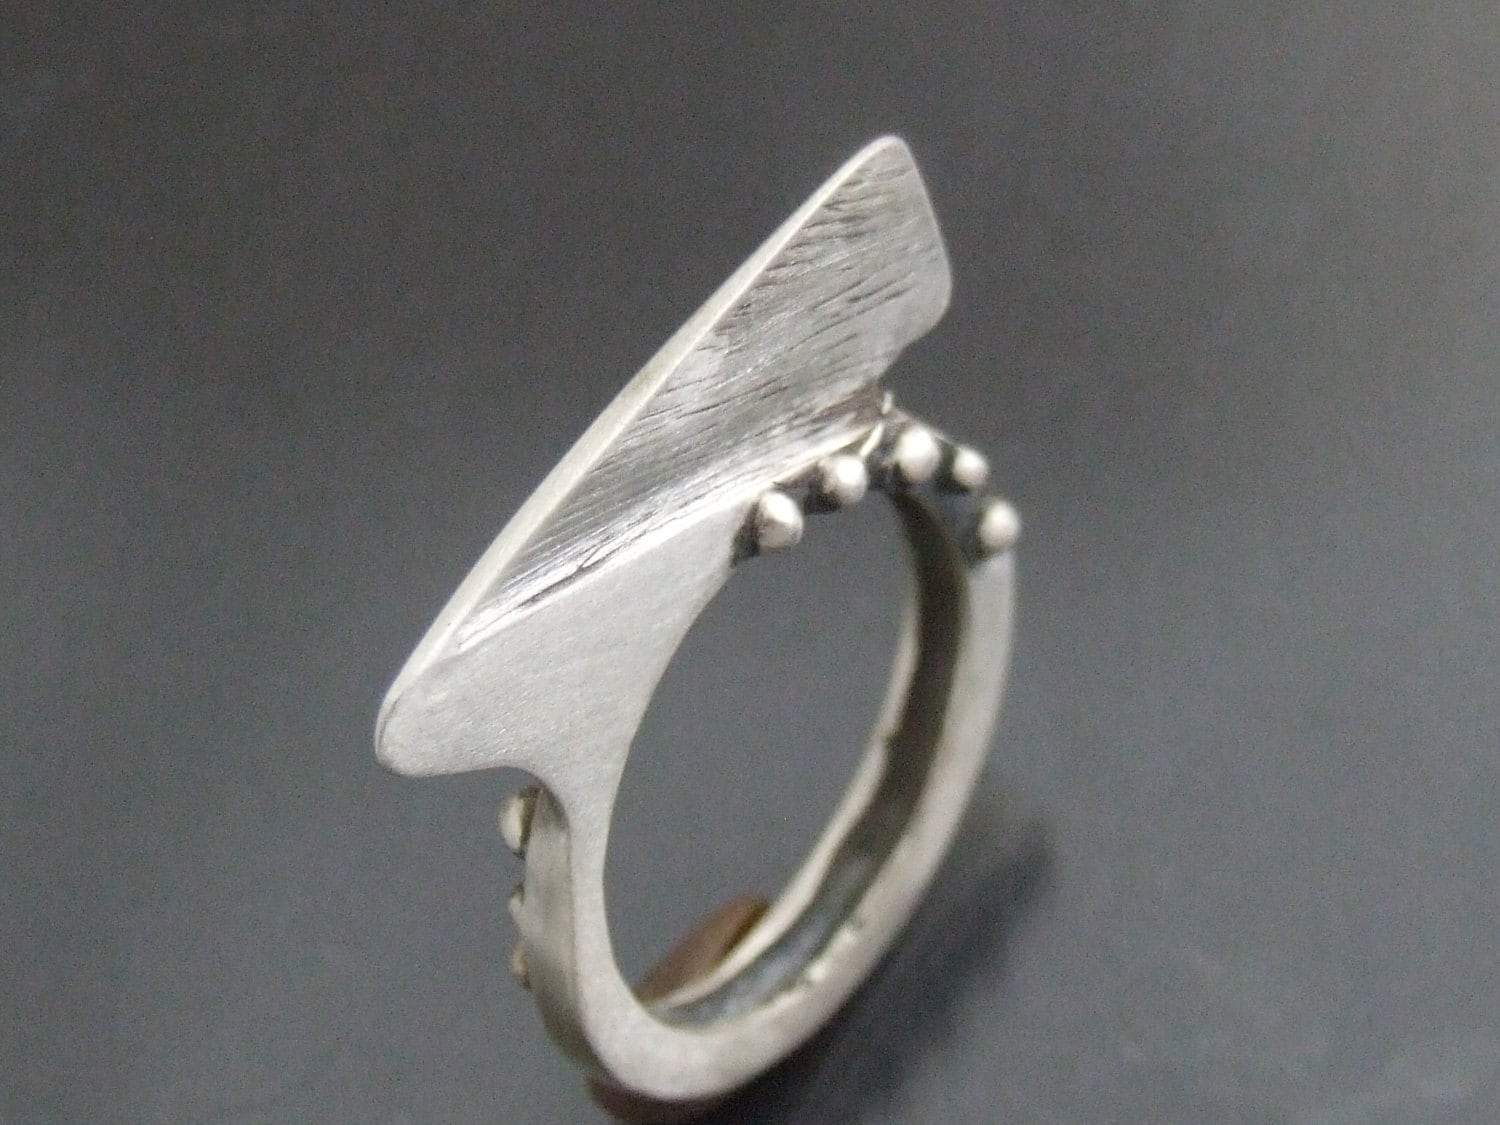
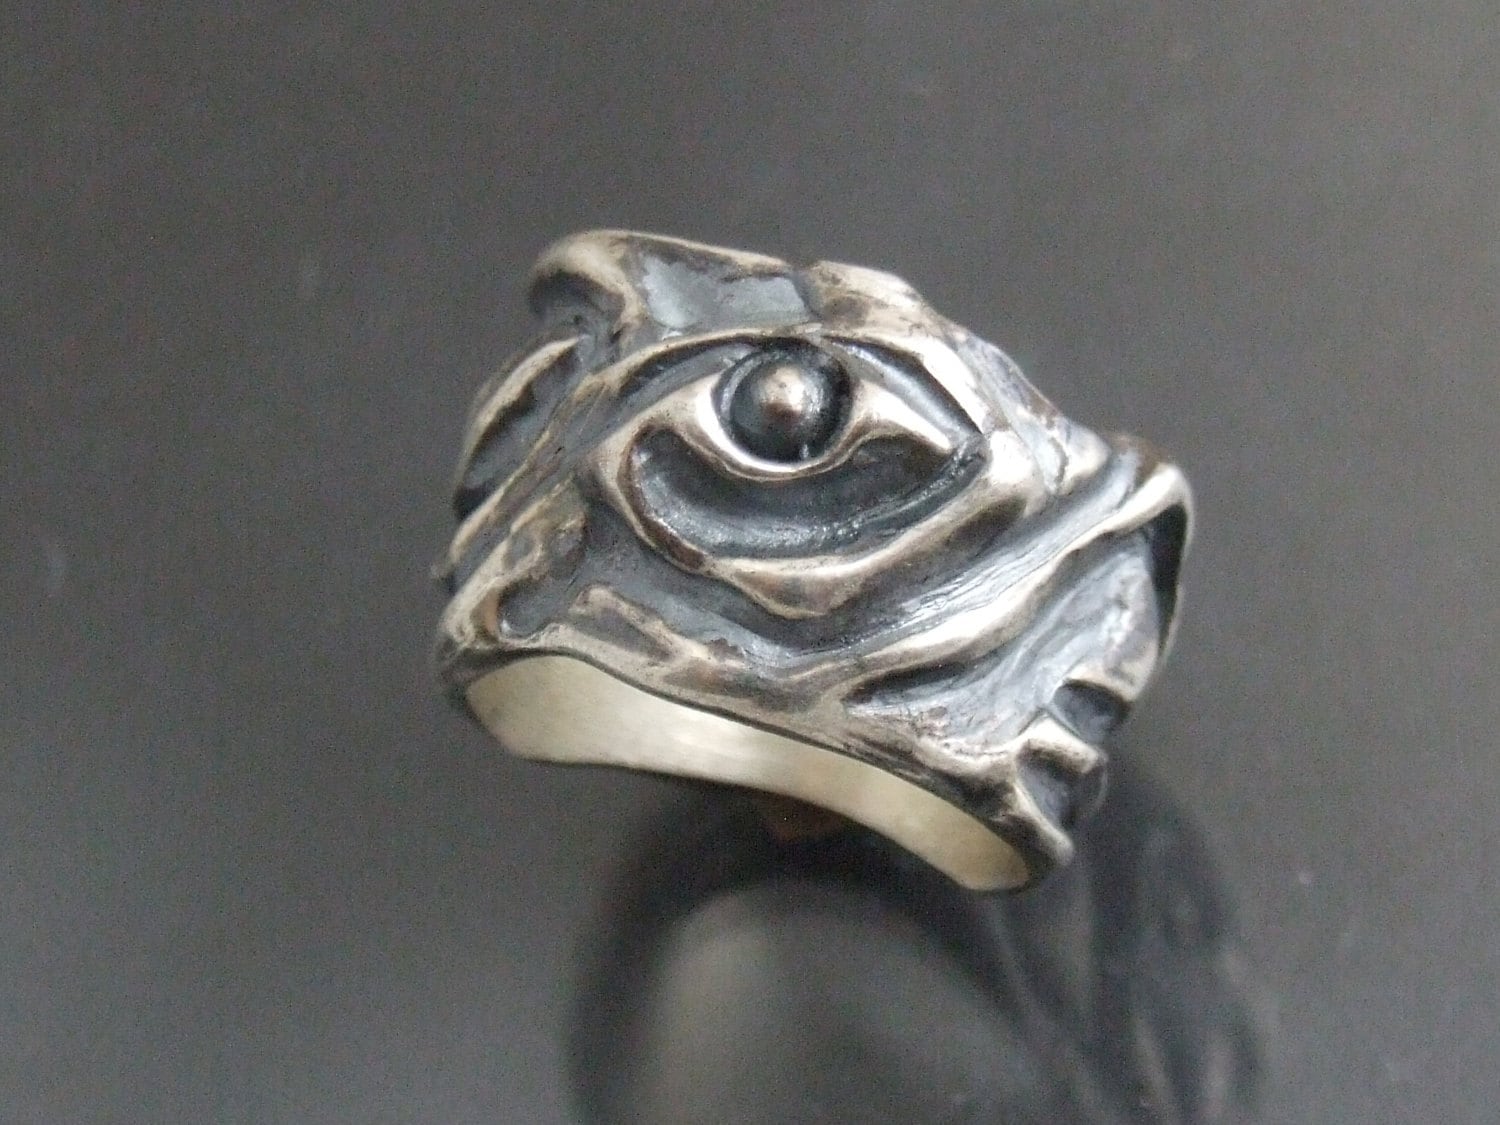
Sculptural Ring Castings


Brooklyn, New York, United States
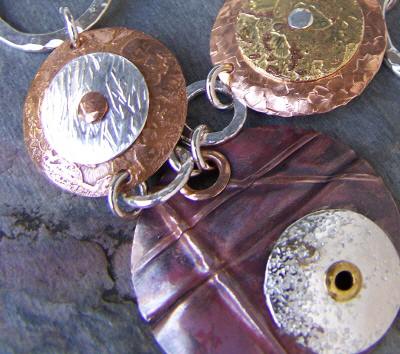
http://theyarnmonkey.blogspot.com/2009/08/wax-carving-and-silver-design.html 


Gison Liedholm
Abstract ring by 
http://www.etsy.com/listing/89635341/ooak-sharks-knives-lost-wax-cast


Artist Unknown

http://www.etsy.com/listing/89642631/ooak-silver-eye-lost-wax-cast-sterling


Warm Up - Pick a partner or two and critique one of the rings on the handout.  

1 Describe what you see. This is the objective portion of the art critique. It only includes a description of the type of art the objects in the artwork, and the style.  
·         Artist's name.
·         Title of work.
·         Type of jewelry ring, bracelet, pendant, etc. 
·         Subject of the design, etc.
·         Recognizable objects in the jewelry
·         What material did the artist use? (copper, silver, gold, plastic)
·         What is the style?  (representational, abstract, non- Objective)


2 Analyze the artwork.  How do the elements work together to create an overall impression conveyed by the jewelry. Elements you need to analyze when you critique artwork include:
  • What type of colors were used? bright, warm, cool, muted, complimentary, neutral, monochromatic
  • Types of shapes and lines used. vertical, horizontal, geometric, organic, curvy, straight, graceful, wavy
  • Types of space; flat, shallow deep
  •  How each element contributes to the mood, meaning and aesthetic sensation of the jewelry
  • Subject of the design, etc.
    • Recognizable objects in the jewelry
  •  What material did the artist use? (copper, silver, gold, plastic)
  • What is the style?  (representational, abstract, non- Objective)

Learning Objective: You will learn the basics of the lost wax casting process and gain a greater understanding of repetition and three dimensions used in jewelry design.

Vocabulary:

sculptural- 1.The art or practice of shaping figures or designs in the round or in relief, as by chiseling marble, modeling clay, or casting in metal.
2. Ridges, indentations, or other markings, as on a shell, formed by natural processes.
lost-wax casting - A casting process for which a sculptor must first produce his sculpture in wax. She/he creates a mold around this made of refractory materials or investment. When the mold is heated, the wax melts away, so that molten metal can replace it, reproducing exactly the original wax sculpture.

sprue - In lost-wax casting, a channel through which molten metal can enter a mold (runners) and air and gas can escape (risers). This term applies to the wax rods attached to the wax model that result in the formation of these channels, and for the rods of metal that may be cast within channels once metal is put into the mold. In some regions, to attach the wax rods is called spruing.

investment - A thick jacket of refractory material poured around a wax model which forms the mold in lost-wax casting.

additive- building up the surface by melting wax to the wax base.

subtractive- starting with a larger mass and removing wax from it with tools.

Agenda - 

  • Critique a ring
  • Draw 10 sculptural ring designs
Jewelry II Agenda -
  • Draw 10 rings with a function wax cast design ideas. 
    • The function will most likely be fictional.
      • Traditional function- Graduation, wedding, superbowl, etc.
      • Fictional - Super power, magic healing ring, making wishes, etc...

Criteria: You will design a ring using sculptural elements to define the space around the ring. Think about things found in nature to design a sculptural ring.
  • Start with 10 ring design drawings
  • 2 carvings - carved out spaces or shapes/forms within and throughout the design. 


by Hans Meevis


Wax Carving Process
Wax must weigh less than 1.5 grams
1.    Saw wax tube with spiral saw blade.
a.    Saw the width thickness that you want
b.    Saw 2 pieces for rings you will be carving and then you will choose the best carving.

2.    Sizer:  Use the wax sizer mandrel to carve out the correct size.
a.    Don’t carve too much
b.    Be aware to not leave big marks on inside by pressing too hard

3.    Carving: 
a.Use pointed tools to draw on wax first if you want to draw out design  
b. Start with the large wax file and carve the basic shape
c.   Use your large half round file to form design
d.   Go to the small files to get design
e.   You can also use the above tools for texture marks
f.    Remember to carve the thickest parts first, then go down to the thinnest to prevent breaking the wax model
g.   If you press too hard you will break the wax model.
h.  Never try on your ring during the carving process because it can easily break.
i.    If you break the wax, repair it with super glue.
j.  Don't use your first piece as a gift for your sweetheart or bestie.. Your first attempt is going to be very special and will be something that you will keep forever to look back on.  
k. Weight: Remember someone is only going to wear a piece of jewelery if it is comfortable. Rings for men shouldn't weigh more than 15gms and less for woment. The weight of the wax will be a different ratio for each metal. For Silver multiply the weight of the finished wax piece by 10.5

4.    Finishing Steps:
a.    It is very important that all marks are out of the wax.  It takes a lot less time to remove marks now, than if in the metal!!!
b.    Gently file with fine files, then sand with 400, then 600, buff with a nylon

           
REMEMBER TO TAKE OUT ALL SCRATCHES NOW THAT YOU SEE IN THE WAX!!!
IT WILL TAKE 10 TIMES LONGER TO GET THEM OUT OF METAL!!!!


Resources- http://external-brain.redwolf.com.au/2011/03/01/silver-tentacles-ring-by-peggy-skemp/
http://www.flickr.com/photos/janosgaborvarga/2869094192/
http://hansmeevis.blogspot.com/2009/11/waxes-cast-rings-shells-and-gears.html


Monday, December 3, 2018

Day 54 - 63 Cabochon Stone Setting & Independent Project

Agenda- 
  • FINAL - Art Show Display this semester
    • Prepare your best jewelry piece of the semester to show by Friday
    • Type up your Artist Statement in C147- December 4th, 2018
    • Display your work and artist statement the 7th or 10th in the case.  
    • Observe the Student End of Semester Art Show - Dec. 10th
    • Write your Final Critique Dec. 13th
Water, Elements #4  

  • Four Elements - Cabochon Stone Set Pendant Due Dec. 18th
Earth, air, fire, & water – the four elements.  
Design Problem 
Use all four elements in your design for the cabochon stone setting.  
Many people are drawn to one particularly, associating certain things with each.  In metalsmithing we use all four elements to make the work. 
  • EARTH – Metal ore comes from the earth, is mined from it’s depths.  And of course gemstones are just shined up rocks!
  • FIRE – This one’s easy.  You need fire to smelt the ore and to then shape the metal.  You also use it to fuse or solder pieces together.
  • AIR – The torch is an acetylene/air torch, drawing atmospheric air into the gas stream.  Also, air helps to cool your pieces sometimes.
  • WATER – We use water to “quench” a hot piece of metal.  Sometimes this is just to cool it down, other times it’s used in the actual tempering process of the metal (usually steel.)

Below are five videos on how to set a cabochon stone.

Art Jewelry - Making a bezel part 1 

Art Jewelry  - Making a Bezel part 2

Art Jewelry - Making a bezel part 3 

Art Jewelry - Making a bezel part 4 

Art Jewelry - Making a bezel part 5

Past Student Work