Monday, October 1, 2018

Day 23 - 25 Soldered Wire Bracelet Set


Learning Objective -  You will be able to work with forming wire and soldering while designing a bracelet set that is based on a famous artist's style.

Language Objective - Copy down the definition for soldering into your notebook or sketchbook and watch the demonstration.  
Vocabulary
Soldering - when two pieces of metal are joined together using heat and a metal alloy. Basically, the metal alloy "glues" pieces of metal together. Examples of alloys that you would use would be a silver soldering alloy for silver, copper, and brass. A gold soldering alloy would work best for gold metal, which requires a higher temperature than silver. Soldering is similar to welding or brazing, both use heat to join pieces of metal together, however, soldering requires less heat.
Three Tips for Soldering
  1. Keep it clean: Solder won't flow and join your pieces of metal jewelry together if any part of the equation is dirty. (Metal, solder, flux)
  2. Get rid of gaps: Join the metal pieces you're soldering tightly together. Solder will not fill gaps in metal. Flatten pieces so that every part touches!!!
  3. Solder flows towards heat: Never direct the flame from your torch directly at the solder. Heat the metal where you want the solder to flow (towards the pieces needing joining). The whole piece needs to heated evenly!!!
Agenda -
  • Look at the artists you researched and use their work as inspiration for your designs. 
  • Draw 5 designs with three separate pieces of metal. These pieces will be linked together and combined using hand made chain work. 
    1. Artist Inspired Bracelets will be Due Thursday, October 18th.  
    2. Jewelry II- 
      • Finish up your beads Due This Thursday Oct. 4th
    Wire Designed Bracelet Set Rubric                              Standard: Invent and Discover to Create

    Demonstrate competency in   traditional and new art media
    Exemplary
    4
    Advanced
    Accomplished
    3
    Proficient
    Developing
    2
    Partially Proficient
    Beginning
    1
    Unsatisfactory
    Evidence Outcome:
    Create works of art representing traditional subject matter that use new media
    Excellent care and craftsmanship shown in the work. Your design has more than 5 pierced areas. The design is based on nature and it is original, no cliché images were used. The bracelet is wearable no sharp edges or points, it’s curved properly and the links are neat and stable. Cutting is accurate on the piece and proper filing has left the edges completely smooth, and sanding has removed solder, file marks, and scratches. Wires are soldered completely to the surface and ends of the wire are filed. The surface is evenly sanded or polished the surface looks finished. If you used Liver of Sulfur the surface is even and properly sanded with steel wool to create a soft bright finish. 
    Proficient/satisfactory care, craftsmanship and skill shown in the work. Your design has at least 5 pierced areas. The design is based on nature and it is original, no cliché images were used. The bracelet is wearable no sharp edges or points, it’s curved properly and the links are neat and stable. Cutting is accurate on the piece and proper filing has left the edges mostly smooth, and sanding has removed most of the solder, file marks, and scratches. Wires are soldered completely to the surface and ends of the wire are filed. The surface is evenly sanded or polished the surface looks finished. If you used Liver of Sulfur the surface is even and properly sanded with steel wool to create a soft bright finish. 
    Developing care, craftsmanship and skill shown in the work.  Your design has less than 5 pierced areas. You may have used cliché images for the design. Piercing has some sharp edges or points and it may not have been curved properly. Cut out areas are over-cut. Cutting is mostly accurate on the piece. Proper filing has left the edges mostly smooth, and sanding has not removed all of the solder, file marks, and scratches. Wires are not completely soldered onto the surface and or the ends of the wire are not filed. The surface is not evenly sanded or polished. You may not have completed your bracelet with a smooth finish or patina.
    Beginning care, craftsmanship and skill shown in the work.  
    Your design has less than 4 pierced areas. You’ve used cliché images for the design. Piercing has sharp edges or points and is not curved. Cut out areas are over-cut. Cutting isn’t accurate on the piece. The work is not filed, and sanding has not removed all of the solder, file marks, and scratches on the surface. Wires are not completely soldered onto the surface and or the ends of the wire are not filed. The surface is not evenly sanded or polished. Your bracelet does not have a finish on the surface. 

    Tuesday, September 18, 2018

    Day 18 Turn in Two Pierced Pendants


    Learning Objective-  Jewely I - Continue to work on your pendants to develop piercing, filing, sanding, finishing and forming skills.
    II- Continue to work on your bead project developing advanced soldering skills.    


    Language Objective-Write down the definition for forming, recall the demonstration from yesterday and form one or both of your pendant pieces.  
    II- Using the How to: Sweat Soldering link read the definition and the process of sweat soldering.  Watch the demonstration and take notes.  

    Vocabulary- 
    forming- process of shaping metal primarily through the use of a hammer and a stake, dapping block, or shaped surface. 

    Agenda-
    • Demo forming, making links, and tying adjustable knotted leather cord
    • Work on complete your two pendants. 
      • Try forming one of your pendant designs. 
      • Create a link for each pendant
      • Create an adjustable cord or attach the link to a key ring
      • Grade your pendant using the Pierced Pendant Rubric  
      • Place each pendant in a bag and place them in the TURN IN BOX at the front of the room.  
    • Start on your next project Solder Wire Jewelry
      • Your work must incorporate three pieces of metal with soldered wire design on the surface.  
      • Wire work or Chain work included as part of your design.  
    Pierced Pendant Rubric 
    Demonstrate competency in traditional and new art media
     4
    Advanced Understanding of the Standard
     3
    Meets the Standard
     2
    Approaching the Standard
     1
    Does Not Meet the Standard
    Evidence Outcome:
    Create works of art representing traditional subject matter that use new media
    Excellent care and craftsmanship shown in the work. Your design has over 3 pierced areas. It is original no cliché images were used. Piece is wearable no sharp edges or points. Cut out areas are not over-cut. Cutting is accurate on the piece. Proper filing has left the edges completely smooth, and sanding has removed file marks and scratches. Buffing has removed fine scratches and polishing has applied a high quality mirrored finish.
    Proficient/satisfactory care, craftsmanship and skill shown in the work. Your design has 3 pierced areas. It is original no cliché images were used. Piece is wearable no sharp edges or points. Cut out areas are not over-cut. Cutting is accurate on the piece. Proper filing has left the edges  mostly smooth, and sanding has removed file marks and scratches. Buffing has removed fine scratches and polishing has applied a high quality luster. 
    Developing care, craftsmanship and skill shown in the work.  Your design has less than 3 pierced areas. You may have used cliché images for the design. Piercing has some sharp edges or points. Cut out areas are over-cut. Cutting   is mostly accurate on the piece. Proper filing has left the edges mostly smooth, and sanding has not removed all of the file marks and scratches. Buffing has not removed all of the fine scratches and polishing is reflective in parts. 
    Beginning care, craftsmanship and skill shown in the work.  
    Your design has less than 2 pierced areas. You’ve used cliché images for the design. Piercing has sharp edges or points. Cut out areas are over-cut. Cutting isn’t accurate on the piece. The work is not filed, and sanding has not removed all of the file marks and scratches. Buffing has not removed all of the fine scratches and polishing is cloudy or not polished. 

    Monday, September 10, 2018

    Day 10 & 17 Finishing Work

    http://www.beadinggem.com/2012/09/how-to-sand-and-polish-metal-tutorials.html
    Warm Up- Write down all the safety rules and instructions you remember about using the buffing/polishing equipment.  Why is this important? 


    Learning Objective- Today you will learn how to use the buffing and polishing equipment to give you pendants a high polish.   


    Language Objective- Write down the definitions below, watch the demonstrations and take notes and buff and polish your own work.  

    Vocabulary- 

    Buffing- Part of the finishing process in jewelry that removes the 600 grit sanded surface and  prepares the metal surface for polishing.

    Polishing- A finishing technique that creates a mirror like surface on metal.  

    Tripoli-  A buffing compound which removes scratches made by 600-grit 
    sandpaper, it is gray in color.

    Rouge- A very fine polishing compound leaves a mirror finish. This is done after you have buffed.  The compound is red in color.

    Tips for Buffing and Polishing
    •  Always wear safety glasses.
    • Make sure to have your hair pulled back and do not wear loose clothing. It may catch in machinery and cause an accident.
    • Hold your work firmly at all times. Use a wooden board to back your jewelry piece. 
    • Use a little pressure against wheel. 
    • Always hold work below center of wheel.
    • Move your piece constantly and buff and polish your piece different directions to avoid grooves in your work.  
    • Never take your eyes OFF work for an instant.
    • Use caution when buffing an article with sharp projections or points. It might catch in wheel and be torn out of your hands. Point anything pointy down not up.  
    • If wheel slows down, you are pressing too hard.

    Agenda- 
    • Copy vocabulary and tips for buffing and polishing
    • Buffing Polishing Demo
    • Continue to work on your 2 pendants.
    • Demonstrate 
      • How to make links
      • How to tie an adjustable cord
    • Pendants are Due the beginning of the period on Thursday the 13th of September
    Sanding Tips
    • Start with 320/220 Sandpaper and sand back and forth in one direction until you do not see any scratches or nicks on the surface.
    • Do NOT push hard, let the sandpaper do the work.
    • Next use the 400 sandpaper and sand in the opposite direction
    • Keep sanding in this direction until you can not see the 320 or 220 sanding lines on the surface of the metal.
    • Next use the 600 sandpaper and sand in the opposite direction.  Keep sanding until you can not see the lines left behind from the 400 paper.  
    CONGRATULATIONS! NOW YOU ARE READY TO BUFF AND POLISH!!! 
    Pierced Pendant Rubric 
    Demonstrate competency in traditional and new art media
     4
    Advanced Understanding of the Standard
     3
    Meets the Standard
     2
    Approaching the Standard
     1
    Does Not Meet the Standard
    Evidence Outcome:
    Create works of art representing traditional subject matter that use new media
    Excellent care and craftsmanship shown in the work. Your design has over 3 pierced areas. It is original no cliché images were used. Piece is wearable no sharp edges or points. Cut out areas are not over-cut. Cutting is accurate on the piece. Proper filing has left the edges completely smooth, and sanding has removed file marks and scratches. Buffing has removed fine scratches and polishing has applied a high quality mirrored finish.
    Proficient/satisfactory care, craftsmanship and skill shown in the work. Your design has 3 pierced areas. It is original no cliché images were used. Piece is wearable no sharp edges or points. Cut out areas are not over-cut. Cutting is accurate on the piece. Proper filing has left the edges  mostly smooth, and sanding has removed file marks and scratches. Buffing has removed fine scratches and polishing has applied a high quality luster. 
    Developing care, craftsmanship and skill shown in the work.  Your design has less than 3 pierced areas. You may have used cliché images for the design. Piercing has some sharp edges or points. Cut out areas are over-cut. Cutting is mostly accurate on the piece. Proper filing has left the edges mostly smooth, and sanding has not removed all of the file marks and scratches. Buffing has not removed all of the fine scratches and polishing is reflective in parts. 
    Beginning care, craftsmanship and skill shown in the work.  
    Your design has less than 2 pierced areas. You’ve used cliché images for the design. Piercing has sharp edges or points. Cut out areas are over-cut. Cutting isn’t accurate on the piece. The work is not filed, and sanding has not removed all of the file marks and scratches. Buffing has not removed all of the fine scratches and polishing is cloudy or not polished. 

    Tuesday, August 28, 2018

    Day 9 - SAFETY & Filing Pendants

    Safety in the Jewelry Studio!!!

    Warm up- Take out a notebook and pencil to take notes on Safety!!! You must have a perfect score on your General Safety test to work with any equipment!

    Learning Objective- You will learn about safety equipment, safeguards, and safety rules in the jewelry classroom and apply your knowledge to the General Safety Quiz on Friday.

    Language Objective- Students with listen and take notes on Safety in the jewelry classroom, creating a list to help them organize the topics of safety and studio areas of concern. 

    Agenda-
    • Write down the following SAFETY Procedures:
      •  Make a list for each of the following topics:
        • Pickle
        • Buffing polishing wheels 
        • Torches 
        • General
        • Test on Thursday!!!
    • Tips for Filing
      • Put pressure on your metal on the downward or forward stroke of the file
      • Think about the shape you're filing and the flat or curved surface of the file, (curved side goes on an inside curve of the design, flat file would be used on an outside curve).   
      • To get a smooth straight line use a long stroke to file along the edge as far as possible. 
      • Overlap your file strokes when moving to a new area of the piece.
      • If a small section is extra bumpy and you want it to be smooth, work on the one spot to make it more even and then continue to file the whole piece. 
    • Filing Demonstration  
    • Work time
    Homework-
    Study for your Safety test on Thursday!!!


      Friday, August 24, 2018

      Day 6 to 8 - Pierced Pendant Design


      Tony P. graduated MRHS student
      Warm Up -  Answer the following questions: 
      1. What do you need to do to the metal before drilling holes with the Flex Shaft tool?
      2. How do you hold the Flex Shaft tool while drilling holes?  
      3. What two safety rules must you follow to use the Flexible Shaft tool?
      Learning Objective: Students will create an interesting design using the elements and principles of design and learn the basics of saw piercing.

      Language Objective: Students will listen and watch the demonstrations to learn how to drill holes and peirce their metal.  

      Video:  Demo on  Drilling Holes into Metal 

      Video: Saw Peircinging Demo

      Vocabulary Word: 
      piercing- to cut out shapes in sheet metal  using a jewelers saw.

      A Fun Blog about Saw Piercing: The joys of Sawing Piercing Blog

      Agenda: 
      • Saw Piercing Tips
      1. Cut out the inside shapes before sawing out the outside shape.
      2. Use your body to hold the saw when attaching the saw blade.
      3. Make sure the fit of the blade is tight. (High pitched when plucked.)
      4. Hold your saw at a right angle to your metal, or straight up and down.
      5. Use bees wax to lubricate your saw blade when it starts to feel stuck.
      6.  Don't push the saw. Relax your arm when sawing and let the blade do the work.
      7. Be sure your sawing arm is in front of your bench pin where you work. (Don't place your       pin in front of your torso.)
      8. Hold your metal tight on the bench pin.
      9. Turn your metal to make a turn or curve, not your saw.  
      10. Saw slowly when completing the the circle of the cut to avoid warping your metal.

      • Complete Designs for pendants, 20 total drawings 10 designs with at least 3 piercings within a circle or oval. 10 designs using your outside shape with  at least three piercings within. 
      • Continue to work on your pendants 

      Designing Process
      • Brainstorm image or object images you could use for inspiration for your design.
      • Use positive and negative space to design  your images.
      Step 1:          10-12 beginning design concepts for both pendants.  One design should fit into an oval, or round shape.  The other design can be its own shape.  NO BIGGER THAN 1 1/2 X 2 INCHES.  These will be reviewed for credit.  LEAVE ENOUGH SPACE BETWEEN PIERCED AREAS AS TO NOT CUT OR BUFF THROUGH THE METAL FROM ONE SPACE TO ANOTHER. Include a minimum of three piercings within the shape.

      Step 2:            With the instructor, select one design for your final.  Upon finalization of drawings, ideas to the instructor and receive materials.

      1. Glue paper drawing on metal with rubber cement.
      2. Punch the negative spaces with the awl and drill holes in metal.
      3. Saw inside and outside edges with jewelers saw.
      4. Support work with bench pin and C-clamp by securing to table top.
      5. After all sawing is complete file all edges with either a large half-round file or small needle file.

      Finishing
      1. Sand with wet-dry sandpaper start with 320, then use 400, and finally use 600
      2. Buff using Tripoli
      3. Polish using Rouge
      4. Attach finished piece to leather cord using a link

      Friday, August 17, 2018

      Day 2 to 5 - Saw Piercing

      Learning Objective Students will learn the basic tools and basic skills for cutting or piercing metal using a jeweler's saw, bench pin, and Fordom tool for drilling holes.  
      Language Objective-  Work in groups to answer questions about a piece of jewelry.  
      Agenda-

      • Sylabus
      • Safety Contract
      • Tool Contract
      • Saw Piercing Project 

      Vocabulary:


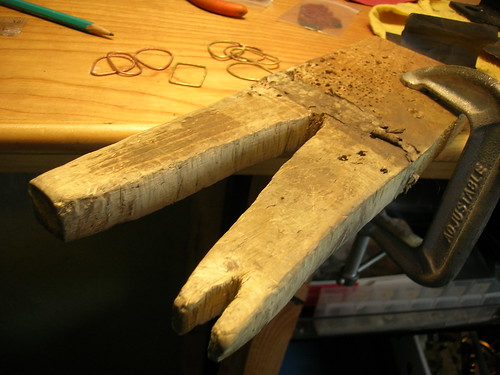
      Bench Pin: This is used for filing, sanding, sawing, and any other work you do with your metal. It is attached onto the edge of the jewelry bench or table you use. This allows you to file or saw a piece of metal and have room to move your tool around and still hold onto the metal.


      Below is a link to many different used bench pins.
       http://www.flickr.com/groups/benchpin/pool/


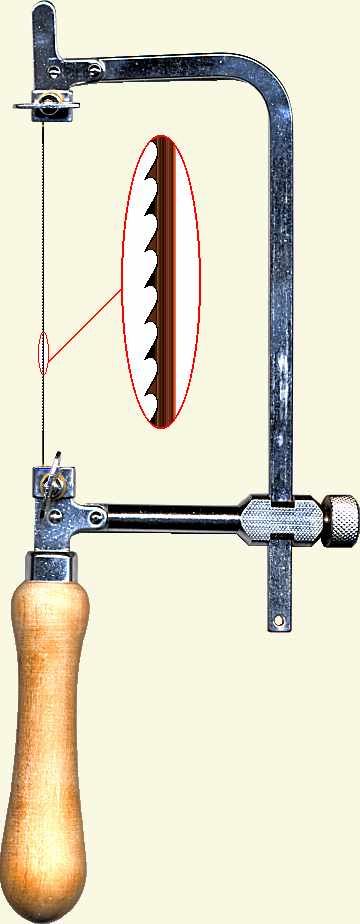
      piercing saw is a type of saw commonly used in jewelry making on sheet metal. It is usually used on softer metals as the saw is delicate.

      http://www.dave-cushman.net/bee/piercingsaw.html


      Flexible Shaft Tool- 

      A power rotary tool.  It is similar to a Dremel tool found  in woodworker shops. The tool system is a simple rotary motor that has a hand piece which can handle many different attachments. The user holds the hand piece with the desired attachment tip and operates the motor with a foot pedal.


      Shelby W.   MRHS Jewelry Student 2010-11
      Saw Piercing Assignment:The saw piercing assignment consists of cutting two designs from sheets of metal, (copper or brass), with a jewelers saw.   The First Design will fit into an oval or round shape.  The Second Design will have its own shape.  This process will give you the skills required to use of some basic jewelry tools. Designs must be original.  Craftsmanship, design, and the quality of the finished work, are the primary criteria for grading your work.


      Tools:             
      • Flexible Shaft Tool- for drilling
      • C Clamp- Your Bench Pin and C-Clamp will be set up every class day.  All your work will be done using these two invaluable tools.  
      • Bench Pin
      • Jewelers Saw 
      •  Files
      • Sand Paper
      • Buffing and Polishing equipment- 

      Step 1:            10-12 beginning design concepts for both pendants.  One design should fit into an oval, or round shape.  The other design can be its own shape.  NO BIGGER THAN 1 1/2 X 2 INCHES.  These will be reviewed for credit.  LEAVE ENOUGH SPACE BETWEEN PIERCED AREAS AS TO NOT CUT OR BUFF THROUGH THE METAL FROM ONE SPACE TO ANOTHER. Include a minimum of three piercings within the shape.
      Step 2:            With the instructor, select one design for your final.  Upon finalization of drawings, ideas to the instructor and receive materials.

      1. Glue paper drawing on metal with rubber cement.
      2. Punch the negative spaces with the awl and drill holes in metal. There should 3 three saw pierced areas within your design.
      3. Saw inside first then outside edges with jewelers saw.
      4. Support work with bench pin and C-clamp by securing to table top.
      5. After all sawing is complete file all edges with either a large half-round file or small needle file.

      Finishing
      1. Sand with wet-dry sandpaper start with 320, then use 400, and finally use 600
      2. Buff using Tripoli
      3. Polish using Rouge
      4. Attach finished piece to leather cord using a link


      Thursday, August 16, 2018

      Welcome to Jewelry I and II Classes!

                
      Jewelry I Student Work
      Jewelry II Student Work


      Welcome to Jewelry Class!

      Learning Objective - You will gain an understanding of the studio guidelines, expectations, and safety rules. 

      Language Objective - Get to know each other and the classroom. 


      Agenda - 
      • Fill out the card with your name and table #. Find a partner and share your answers. Introduce your partner to the class. 
        • What is your past experience with art?
        • What do you want to learn in Jewelry Class? 
        • What is something about you that people don't generally know? 
      • Class Expectations/Safety/Tool Kits
      • Questions
      Cell Phone/Device Policy
      At the start of each unit/lesson, each person's electronic device may be placed in the “caddyshack” until directed otherwise by the teacher.

      You will get four opportunities to put your phone/device away
      • First reminder: You will be asked to put it away (out of your hands/out of sight).*
      • Second reminder: A  temporary home (“caddyshack”: locked in classroom office) for your device until the end of class.
      • Third Reminder: A temporary home (“caddyshack”: locked in classroom office) for your device until the end of class and parent/guardian will be contacted.
      • Final opportunity to put your device away! Cell phone/device to student relations until the end of the day and parent/guardian will be contacted.

      Once you’ve gone through the four opportunities to put your device away, you will receive a referral. Don’t worry about keeping track of your opportunities, I got your back!
      Agenda - Pick up a