Tuesday, September 18, 2018

Day 18 Turn in Two Pierced Pendants


Learning Objective-  Jewely I - Continue to work on your pendants to develop piercing, filing, sanding, finishing and forming skills.
II- Continue to work on your bead project developing advanced soldering skills.    


Language Objective-Write down the definition for forming, recall the demonstration from yesterday and form one or both of your pendant pieces.  
II- Using the How to: Sweat Soldering link read the definition and the process of sweat soldering.  Watch the demonstration and take notes.  

Vocabulary- 
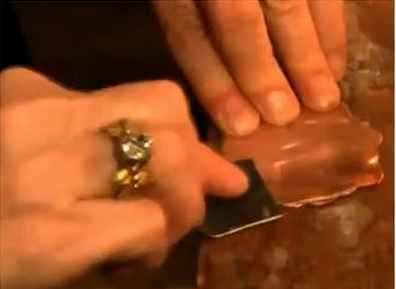
forming- process of shaping metal primarily through the use of a hammer and a stake, dapping block, or shaped surface. 

Agenda-
  • Demo forming, making links, and tying adjustable knotted leather cord
  • Work on complete your two pendants. 
    • Try forming one of your pendant designs. 
    • Create a link for each pendant
    • Create an adjustable cord or attach the link to a key ring
    • Grade your pendant using the Pierced Pendant Rubric  
    • Place each pendant in a bag and place them in the TURN IN BOX at the front of the room.  
  • Start on your next project Solder Wire Jewelry
    • Your work must incorporate three pieces of metal with soldered wire design on the surface.  
    • Wire work or Chain work included as part of your design.  
Pierced Pendant Rubric 
Demonstrate competency in traditional and new art media
 4
Advanced Understanding of the Standard
 3
Meets the Standard
 2
Approaching the Standard
 1
Does Not Meet the Standard
Evidence Outcome:
Create works of art representing traditional subject matter that use new media
Excellent care and craftsmanship shown in the work. Your design has over 3 pierced areas. It is original no cliché images were used. Piece is wearable no sharp edges or points. Cut out areas are not over-cut. Cutting is accurate on the piece. Proper filing has left the edges completely smooth, and sanding has removed file marks and scratches. Buffing has removed fine scratches and polishing has applied a high quality mirrored finish.
Proficient/satisfactory care, craftsmanship and skill shown in the work. Your design has 3 pierced areas. It is original no cliché images were used. Piece is wearable no sharp edges or points. Cut out areas are not over-cut. Cutting is accurate on the piece. Proper filing has left the edges  mostly smooth, and sanding has removed file marks and scratches. Buffing has removed fine scratches and polishing has applied a high quality luster. 
Developing care, craftsmanship and skill shown in the work.  Your design has less than 3 pierced areas. You may have used cliché images for the design. Piercing has some sharp edges or points. Cut out areas are over-cut. Cutting   is mostly accurate on the piece. Proper filing has left the edges mostly smooth, and sanding has not removed all of the file marks and scratches. Buffing has not removed all of the fine scratches and polishing is reflective in parts. 
Beginning care, craftsmanship and skill shown in the work.  
Your design has less than 2 pierced areas. You’ve used cliché images for the design. Piercing has sharp edges or points. Cut out areas are over-cut. Cutting isn’t accurate on the piece. The work is not filed, and sanding has not removed all of the file marks and scratches. Buffing has not removed all of the fine scratches and polishing is cloudy or not polished. 

Monday, September 10, 2018

Day 10 & 17 Finishing Work

http://www.beadinggem.com/2012/09/how-to-sand-and-polish-metal-tutorials.html
Warm Up- Write down all the safety rules and instructions you remember about using the buffing/polishing equipment.  Why is this important? 


Learning Objective- Today you will learn how to use the buffing and polishing equipment to give you pendants a high polish.   


Language Objective- Write down the definitions below, watch the demonstrations and take notes and buff and polish your own work.  

Vocabulary- 

Buffing- Part of the finishing process in jewelry that removes the 600 grit sanded surface and  prepares the metal surface for polishing.

Polishing- A finishing technique that creates a mirror like surface on metal.  

Tripoli-  A buffing compound which removes scratches made by 600-grit 
sandpaper, it is gray in color.

Rouge- A very fine polishing compound leaves a mirror finish. This is done after you have buffed.  The compound is red in color.

Tips for Buffing and Polishing
  •  Always wear safety glasses.
  • Make sure to have your hair pulled back and do not wear loose clothing. It may catch in machinery and cause an accident.
  • Hold your work firmly at all times. Use a wooden board to back your jewelry piece. 
  • Use a little pressure against wheel. 
  • Always hold work below center of wheel.
  • Move your piece constantly and buff and polish your piece different directions to avoid grooves in your work.  
  • Never take your eyes OFF work for an instant.
  • Use caution when buffing an article with sharp projections or points. It might catch in wheel and be torn out of your hands. Point anything pointy down not up.  
  • If wheel slows down, you are pressing too hard.

Agenda- 
  • Copy vocabulary and tips for buffing and polishing
  • Buffing Polishing Demo
  • Continue to work on your 2 pendants.
  • Demonstrate 
    • How to make links
    • How to tie an adjustable cord
  • Pendants are Due the beginning of the period on Thursday the 13th of September
Sanding Tips
  • Start with 320/220 Sandpaper and sand back and forth in one direction until you do not see any scratches or nicks on the surface.
  • Do NOT push hard, let the sandpaper do the work.
  • Next use the 400 sandpaper and sand in the opposite direction
  • Keep sanding in this direction until you can not see the 320 or 220 sanding lines on the surface of the metal.
  • Next use the 600 sandpaper and sand in the opposite direction.  Keep sanding until you can not see the lines left behind from the 400 paper.  
CONGRATULATIONS! NOW YOU ARE READY TO BUFF AND POLISH!!! 
Pierced Pendant Rubric 
Demonstrate competency in traditional and new art media
 4
Advanced Understanding of the Standard
 3
Meets the Standard
 2
Approaching the Standard
 1
Does Not Meet the Standard
Evidence Outcome:
Create works of art representing traditional subject matter that use new media
Excellent care and craftsmanship shown in the work. Your design has over 3 pierced areas. It is original no cliché images were used. Piece is wearable no sharp edges or points. Cut out areas are not over-cut. Cutting is accurate on the piece. Proper filing has left the edges completely smooth, and sanding has removed file marks and scratches. Buffing has removed fine scratches and polishing has applied a high quality mirrored finish.
Proficient/satisfactory care, craftsmanship and skill shown in the work. Your design has 3 pierced areas. It is original no cliché images were used. Piece is wearable no sharp edges or points. Cut out areas are not over-cut. Cutting is accurate on the piece. Proper filing has left the edges  mostly smooth, and sanding has removed file marks and scratches. Buffing has removed fine scratches and polishing has applied a high quality luster. 
Developing care, craftsmanship and skill shown in the work.  Your design has less than 3 pierced areas. You may have used cliché images for the design. Piercing has some sharp edges or points. Cut out areas are over-cut. Cutting is mostly accurate on the piece. Proper filing has left the edges mostly smooth, and sanding has not removed all of the file marks and scratches. Buffing has not removed all of the fine scratches and polishing is reflective in parts. 
Beginning care, craftsmanship and skill shown in the work.  
Your design has less than 2 pierced areas. You’ve used cliché images for the design. Piercing has sharp edges or points. Cut out areas are over-cut. Cutting isn’t accurate on the piece. The work is not filed, and sanding has not removed all of the file marks and scratches. Buffing has not removed all of the fine scratches and polishing is cloudy or not polished.