Tuesday, October 23, 2018

Day 36 - 40 Solder Wire Bracelets

Mercedes W. 2016
Warm Up - Look at the chain-work. How do you think she made her chain?  

Learning Objective -  You will be able to work with forming wire and soldering while designing a bracelet that shows rhythm and movement.

Language Objective - Copy down the definition for forming into your sketchbook and watch the demonstration.  
Vocabulary
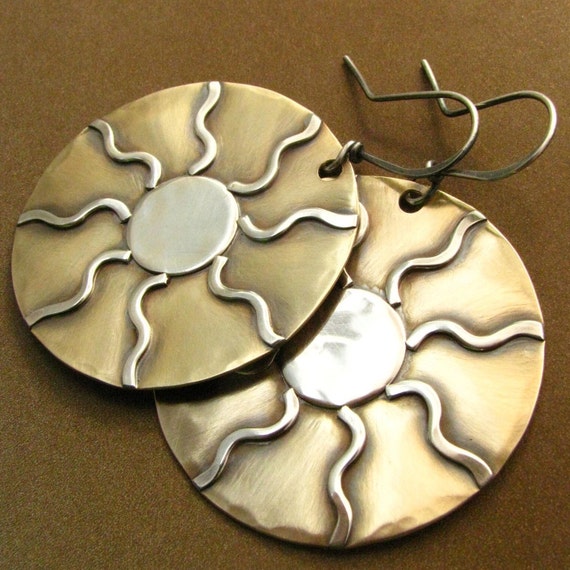
forming- the process of shaping metal primarily through the use of dapping blocks and different shaped mallets or hammers.

patinas- the discoloration that forms on metals as a result of natural aging, typically appearing on silver and bronze. The condition is often planned for when the jewelry is designed, can also be introduced artificially by use of chemicals.

liver of sulfur patina- a chemical compound used in metalworking to create antique-looking patinas on silver and copper bearing alloys such as brass, bronze and copper, used in jewelry to create visible texture. 
Finishing Tips
  • Remove all visible solder using sandpaper. 
  • Sand the surface with all levels of sand paper, 320, 400, and 600 grits
  • Form your bracelet before linking together
  • Use the wider dowels and 18 gauge copper/brass wire for making the links
  • Be sure to clean the surface of your metal with ammonia and water before applying the liver or sulfur patina
  • Let the patina dry completely before using steel wool to gently clean the surface

Agenda -
  • Jewelry I- Work on your bracelets using these steps
    1. Drill holes and Saw pierce
    2. File all the edges
    3. Form wire and flatten to touch the surface of your metal
    4. Solder the wire and pickle
    5. Sand the excess solder off your piece and sand the surface for neatness.
    6. Form your pieces- Be sure your link holes are big enough before you form your bracelet!  
    7. Make links with the 16 gauge wire to link them together
    8. Create chain work and hook to complete the bracelet
    9. Use the Liver of Sulfur to patina  the surface.  
    10. Steel wool to surface to bring up the shine
  • Bracelets are Due Tuesday Oct. 30th
Solder Wire Designed Bracelet Rubric                                            
Demonstrate competency in traditional and new art media

4
Advanced Understanding of the Standard

3
Meets the Standard

2
Approaches the Standard

1
Does Not Meet the Standard
Evidence Outcome:
Create works of art representing traditional subject matter that use new media
Excellent care and craftsmanship shown in the work. Your design has more than 5 pierced areas. The design is original, no cliche images were used. The bracelet is wearable no sharp edges or points, it’s curved properly and the links are neat and stable. Cutting is accurate on the piece and proper filing has left the edges completely smooth, and sanding has removed solder, file marks, and scratches. Wires are soldered completely to the surface and ends of the wire are filed. The surface is evenly sanded or polished the surface looks finished. If you used Liver of Sulfur the surface is even and properly sanded with steel wool to create a soft bright finish. 
Proficient/satisfactory care, craftsmanship and skill shown in the work. Your design has at least 5 pierced areas. The design is original, no cliche images were used. The bracelet is wearable no sharp edges or points, it’s curved properly and the links are neat and stable. Cutting is accurate on the piece and proper filing has left the edges mostly smooth, and sanding has removed most of the solder, file marks, and scratches. Wires are soldered completely to the surface and ends of the wire are filed. The surface is evenly sanded or polished the surface looks finished. If you used Liver of Sulfur the surface is even and properly sanded with steel wool to create a soft bright finish. 
Developing care, craftsmanship and skill shown in the work.  Your design has less than 5 pierced areas. You may have used cliche images for the design. Piercing has some sharp edges or points and it may not have been curved properly. Cut out areas are over-cut. Cutting is mostly accurate on the piece. Proper filing has left the edges mostly smooth, and sanding has not removed all of the solder, file marks, and scratches. Wires are not completely soldered onto the surface and or the ends of the wire are not filed. The surface is not evenly sanded or polished. You may not have completed your bracelet with a smooth finish or patina.
Beginning care, craftsmanship and skill shown in the work.  
Your design has less than 4 pierced areas. You’ve used cliche images for the design. Piercing has sharp edges or points and is not curved. Cut out areas are over-cut. Cutting isn’t accurate on the piece. The work is not filed, and sanding has not removed all of the solder, file marks, and scratches on the surface. Wires are not completely soldered onto the surface and or the ends of the wire are not filed. The surface is not evenly sanded or polished. Your bracelet does not have a finish on the surface. 

Tuesday, October 9, 2018

Day 31 to 35 Chain Work for Bracelet

Student work
Learning Objective- You will be able to manipulate wire to create a chainwork design to complete your Wire Solder Bracelet design.

Language Objective- Pick up a Chain-making Basics handout and read through the techniques and designs.  

Agenda-
  • Watch forming demonstration - Oct. 9th
  • Watch chainwork demonstration - Oct. 11th
  • Watch Patina demonstration - Tuesday Oct. 16th
  • Start designing your own chain work to incorporate into your bracelet piece (you could change this into bracelet earring combination, or a necklace). 
  • Continue to work on your soldering project.  
    1. Solder wire onto surface
    2. Sand the pieces from 280 to 600.
      • Remove all the visible silver solder. 
    3. Form the bracelet pieces.
    4. Create Chainwork to complete the wearable bracelet. 
    5. Patina the surface with liver of sulfer patina
  • Remember safety soldering tips.  
  • Wire Solder Project - Due Next Thursday Oct. 18th
    • If you complete the project early.  You can make a chain-work necklace using beads.  You could make earrings to match, or come up with your own assignment with what you have already learned.   
Jewelry II Agenda - 
  • Metal beads with chainwork -  Due this Friday, Oct. 12th.  
Three Tips for Soldering
  1. Keep it clean: Solder won't flow and join your pieces of metal jewelry together if any part of the equation is dirty. (Metal, solder, flux)
  2. Get rid of gaps: Join the metal pieces you're soldering tightly together. Solder will not fill gaps in metal. Flatten pieces so that every part touches!!!
  3. Solder flows towards heat: Never direct the flame from your torch directly at the solder. Heat the metal where you want the solder to flow (towards the pieces needing joining). The whole piece needs to heated evenly!!!
 ALWAYS REMEMBER SAFETY!!!
  • Hair tied back
  • Wear safety glasses
  • No loose clothing
  • Covered shoes
  • Stay seated at the soldering bay
  • Don't distract anyone working with the torches!!! 
Wire Work Examples
Student work
Student work
Student Work
Student Work
Student Work

Tuesday, October 2, 2018

Day 26 - 30 Solder Wire Bracelets and Soldering Basics

https://www.etsy.com/listing/58963373/large-mixed-metal-earrings-statement?ref=related-2
by  found on Etsy
Learning Objective -  You will be able to work with forming wire and soldering while designing a bracelet that shows rhythm and movement.

Language Objective - Copy down the Solder basics and tips into your notebook.  
Soldering Basics
Soldering refers to the fact that two pieces of metal are joined together using heat and the appropriate type of solder. The best way I can describe solder is it's a metal alloy that 'glues' pieces of metal together. Use silver solder for silver, copper and brass. 

You will use the following tools - torch, striker, soldering pick, flux, brush, silver solder, pickle, copper tongs
Three Tips for Soldering
  1. Keep it clean: Solder won't flow and join your pieces of metal jewelry together if any part of the equation is dirty. (Metal, solder, flux)
  2. Get rid of gaps: Join the metal pieces you're soldering tightly together. Solder will not fill gaps in metal. Flatten pieces so that every part touches!!!
  3. Solder flows towards heat: Never direct the flame from your torch directly at the solder. Heat the metal where you want the solder to flow (towards the pieces needing joining). The whole piece needs to heated evenly!!!
 ALWAYS REMEMBER SAFETY!!!
  • Hair tied back
  • Wear safety glasses
  • No loose clothing
  • Covered shoes
  • Stay seated at the soldering bay
  • Don't distract anyone working with the torches!!! 
Agenda -
  • Jewelry I-  Work on your bracelet designs
  • Solder wire onto your pieces
  • Sand off excess solder and smooth the surface using 320, 400, and 600 grit sandpaper.

Monday, October 1, 2018

Day 23 - 25 Soldered Wire Bracelet Set


Learning Objective -  You will be able to work with forming wire and soldering while designing a bracelet set that is based on a famous artist's style.

Language Objective - Copy down the definition for soldering into your notebook or sketchbook and watch the demonstration.  
Vocabulary
Soldering - when two pieces of metal are joined together using heat and a metal alloy. Basically, the metal alloy "glues" pieces of metal together. Examples of alloys that you would use would be a silver soldering alloy for silver, copper, and brass. A gold soldering alloy would work best for gold metal, which requires a higher temperature than silver. Soldering is similar to welding or brazing, both use heat to join pieces of metal together, however, soldering requires less heat.
Three Tips for Soldering
  1. Keep it clean: Solder won't flow and join your pieces of metal jewelry together if any part of the equation is dirty. (Metal, solder, flux)
  2. Get rid of gaps: Join the metal pieces you're soldering tightly together. Solder will not fill gaps in metal. Flatten pieces so that every part touches!!!
  3. Solder flows towards heat: Never direct the flame from your torch directly at the solder. Heat the metal where you want the solder to flow (towards the pieces needing joining). The whole piece needs to heated evenly!!!
Agenda -
  • Look at the artists you researched and use their work as inspiration for your designs. 
  • Draw 5 designs with three separate pieces of metal. These pieces will be linked together and combined using hand made chain work. 
    1. Artist Inspired Bracelets will be Due Thursday, October 18th.  
    2. Jewelry II- 
      • Finish up your beads Due This Thursday Oct. 4th
    Wire Designed Bracelet Set Rubric                              Standard: Invent and Discover to Create

    Demonstrate competency in   traditional and new art media
    Exemplary
    4
    Advanced
    Accomplished
    3
    Proficient
    Developing
    2
    Partially Proficient
    Beginning
    1
    Unsatisfactory
    Evidence Outcome:
    Create works of art representing traditional subject matter that use new media
    Excellent care and craftsmanship shown in the work. Your design has more than 5 pierced areas. The design is based on nature and it is original, no cliché images were used. The bracelet is wearable no sharp edges or points, it’s curved properly and the links are neat and stable. Cutting is accurate on the piece and proper filing has left the edges completely smooth, and sanding has removed solder, file marks, and scratches. Wires are soldered completely to the surface and ends of the wire are filed. The surface is evenly sanded or polished the surface looks finished. If you used Liver of Sulfur the surface is even and properly sanded with steel wool to create a soft bright finish. 
    Proficient/satisfactory care, craftsmanship and skill shown in the work. Your design has at least 5 pierced areas. The design is based on nature and it is original, no cliché images were used. The bracelet is wearable no sharp edges or points, it’s curved properly and the links are neat and stable. Cutting is accurate on the piece and proper filing has left the edges mostly smooth, and sanding has removed most of the solder, file marks, and scratches. Wires are soldered completely to the surface and ends of the wire are filed. The surface is evenly sanded or polished the surface looks finished. If you used Liver of Sulfur the surface is even and properly sanded with steel wool to create a soft bright finish. 
    Developing care, craftsmanship and skill shown in the work.  Your design has less than 5 pierced areas. You may have used cliché images for the design. Piercing has some sharp edges or points and it may not have been curved properly. Cut out areas are over-cut. Cutting is mostly accurate on the piece. Proper filing has left the edges mostly smooth, and sanding has not removed all of the solder, file marks, and scratches. Wires are not completely soldered onto the surface and or the ends of the wire are not filed. The surface is not evenly sanded or polished. You may not have completed your bracelet with a smooth finish or patina.
    Beginning care, craftsmanship and skill shown in the work.  
    Your design has less than 4 pierced areas. You’ve used cliché images for the design. Piercing has sharp edges or points and is not curved. Cut out areas are over-cut. Cutting isn’t accurate on the piece. The work is not filed, and sanding has not removed all of the solder, file marks, and scratches on the surface. Wires are not completely soldered onto the surface and or the ends of the wire are not filed. The surface is not evenly sanded or polished. Your bracelet does not have a finish on the surface.